Here’s an easy-to-use extension to create custom labels, making user profiles more dynamic and engaging by adding descriptions, WordPress profile tags, and personalized profile labels to your site.

Profile Labels Extension
The Profile Labels extension is a powerful tool that helps make your website’s profiles stand out by adding custom labels to your group members. With just a few clicks, you can include additional data on WordPress user profiles, such as optional descriptions, custom labels, and profile tags. Whether you want to assign multiple labels to a single profile or create unique identifiers for your members, this extension makes it easy. In this article, we’ll walk you through the features and step-by-step process of installing and using the Profile Labels extension to enhance your WordPress site with custom profile labels.
Features
The Profile Labels extension has multiple valuable features;
- Admin of the website can create custom labels for profiles, which can be included in the profile of users.
- It is possible to assign multiple custom Profile Labels to more than one user. Just visit the dashboard and then the Members page for this task.
- A group can also have more than one custom label for Profile. Both existing and new groups contain this feature.
- Admin can filter the members of the group according to a particular label. (This can be done through the Dashboard > ProfileGrid >Members page)
- You can give an optional Description to your custom labels in Profile. (This is visible when the viewer hovers over the Profile Label)
- On the search page of your website, it is possible to filter users according to custom labels that you have/ will create.
Install Profile Labels Extension
To integrate Profile Labels extension to your WordPress, follow the below steps:
- Visit the extensions page of ProfileGrid Memberships and find Profile Label Extension from the extensions menu.

2. Upload and activate the extension.
3. Go to Dashboard, and click on ProfileGrid, and then Extensions

4. Go to Profile Labels Extension and click on Options

Clicking the ‘Options’ will open the page shown in screenshot below:

Create Custom Labels or Edit Existing Labels
1. For creating custom labels click on New Label

2. Then fill in the details like, what label you want to add in the Title section. (this will create a custom label with the exact name on the frontend)
Apart from the Title section, you can also add a Description of the title, choose your favorite border color and background color,
like this,

Add description as required.

Save the label. (in case you don’t save, then the changes will not be saved)

To Edit the label, click on Edit button.

To delete one or multiple custom labels, just select the labels that you want to delete and click on Delete next to New Label.

Assigning the custom Label to a User Profile
To assign the custom label to the user profile,
- Go to the Dashboard and then the Members page of your ProfileGrid Membership Plugin.

2. Select one or multiple users to assign custom labels to the Profile, then click on the Assign Label option.

3. From the pop-up select as many custom labels as you want to and click on Assign

After assigning the custom labels, check out the front-end.

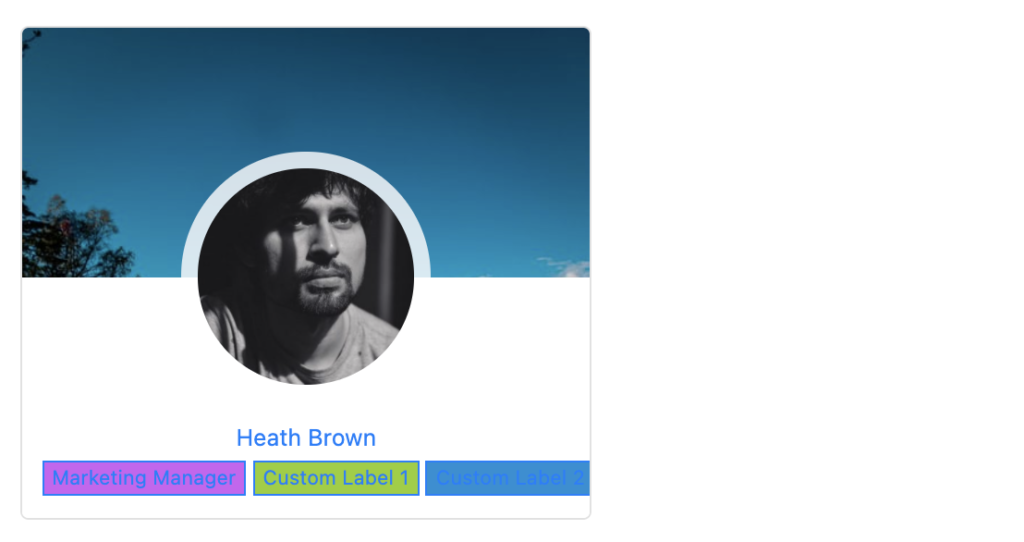
Custom labels enhance the profile and make it very user-friendly for you to manage and showcase your users.
For example, if you search for “Marketing Manager,” the search results will show user profiles with labels that include that keyword.

Result
Similarly, you can create custom labels for various details such as Country, Phone Number, Email ID, or Social Profiles. This allows you to organize and display important information on user profiles, making it easier for others to find and connect with them. With these customizable labels, you can tailor your WordPress site to better suit the needs of your users and enhance their overall experience